
Selling Hire Items
This document provides a comprehensive guide on how to manage the selling and disposal of hire items within the HirePOS system. Properly recording attributes and handling the sales process is crucial for efficient operations.
This article covers setting up for selling Hire items (assets) directly from the Invoice screen.
Unless otherwise stated, the processes outlined in this document apply to singular hire items — that is, hire items that represent a single physical asset with a quantity for hire of 1.
For general management of Hire item disposal and write-off processes, see the Disposed Items help article.
Overview
Setting Up Selling Units
When selling hire items, it is recommended to create a specific Selling Unit for this purpose. Follow these steps:
Go to Setup > Item Related > Selling Units from the main menu.
Click on New Selling Unit.
Enter a descriptive name in the Unit Description field, for example, Hire Sale or Sold – Used.
Check the Item Sales Unit checkbox under the Other tab.
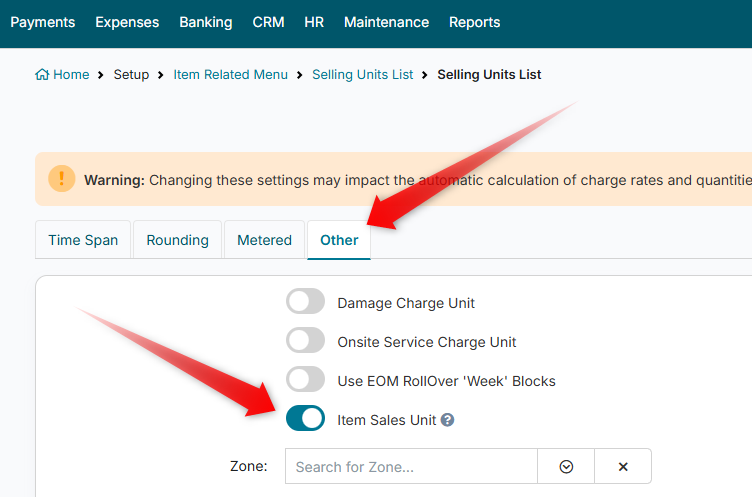
Click Save New to save the new Selling Unit.
Ensure the Sales unit is positioned at the bottom of the Selling Units list for better organisation.
You can do this by clicking the Sort Units link towards the bottom of the Selling Units List screen, dragging the Sales unit to the bottom, and saving.
Handling Sold Items
When using an Item Sales Unit on an Invoice line, HirePOS will redirect you to the Sold Items screen.
From here, you can enter additional details such as:
Serial Number
Whether a Pre Delivery Inspection is required
Whether the item should be made inactive if no after-sales services are required
Once saved, the item becomes customer-owned. If the Pre Delivery Inspection Required field is checked, the item will also have a Pre Delivery Inspection scheduled.
For singular hire items, marking the item as inactive and recording a disposal date will fully remove the item from hire availability. This prevents the item from being added to future invoices and avoids any potential double-booking issues once the item has been sold.
Setting Selling Rates and Prices
Establishing sell prices for hire items is recommended for operational efficiency. While not mandatory, pre-setting prices simplifies the sales process for staff and reduces manual data entry during invoicing.
This involves assigning the Sales unit to the Hire Item in Setup > Items > {item} > Rates/Prices.
Selling Hire Items from the Invoice Screen
Selling Singular Hire Items (Quantity for Hire = 1)
To sell a singular hire item:
Add the item to an Invoice using the Hire Item Sales Unit (for example, the Sales unit created earlier), then click Save.
This will open the Sold Items screen, where you can adjust:
Disposal Date
Price Sold
Serial Number
Make Inactive switch
Pre Delivery Inspection Required switch
Once complete, click Save Changes.
You can also enter disposal details in the Purchase/Disposal tab of the Item setup screen for future reference.
This process records the sale, disposes of the item, and removes it from hire availability.
Selling Part of a Bulk Hire Item (Quantity for Hire Greater Than 1)
Bulk hire items represent a pool of identical items with a quantity available for hire. When selling only part of this quantity, the sales process is similar to singular items, but an additional stock adjustment step is required to correctly reduce hire availability.
Step 1: Add the Sale to an Invoice
Add a line to the current Invoice for the item being sold.
The item will be a Hire Item and will likely default to a hire unit (for example, Day)
Enter the Qty/Items as the number of units being sold
Change the Unit to the Hire Item Sales Unit (for example, Sold – Used)
Enter the desired Each price for the items being sold
Step 2: Save the Invoice
Save the Invoice.
HirePOS will redirect you to the Sold Items screen.
Serial Number fields can be disregarded for bulk items if serial tracking is not required
No changes to disposal or inactivity settings are required for bulk items
Click Save Changes.
At this point, the sales revenue is recorded correctly. However, because this is a bulk hire item, the system does not automatically reduce the quantity available for hire.
Step 3: Record a Stock Adjustment
To reduce the hire quantity by the amount sold, a stock adjustment must be recorded.
This step is planned to be automated in a future update.
Navigate to Setup > Items > Stock Adjustments.
Click New Stock Adjustment.
Select the Item that was sold
Enter the Adjustment Qty to match the quantity sold
Enter a Reason such as “Ex Hire Sales”
Click Save New.
Step 4: Verify the Adjustment
Go to Setup > Items and locate the item.
The Qty for Hire value will now reflect the reduced quantity after the stock adjustment.
Reporting and Exports
Exports to MYOB and Xero
Will be exported to MYOB using the COA Accounts List Code defined on the Selling Unit
This is configured in Setup > Item Related > Selling Units (for example, Sold – Used)
Sales Reports for Sold Hire Items
There are several key reports available to track sales of hire items:
Reports > Sales > Sales by Item Type
Reports > Sales > Sales by Item Type (Summary)
These reports categorise items that use a hire item sales unit into their own type, using the Selling Unit Description as the Item Type name.
A more detailed listing per transaction cab be found in:
Reports > Sales > Sales by Unit (detailed)
For a clear record of quantity changes relating to stock adjustments, use:
Reports > Stock Control > Stock Adjustments
Managing Disposed Items
(This section applies to single Items only, its not applicable to bulk items)
In the Item setup details screen, the Purchase/Disposal tab includes a field for recording the Disposal Date of items. Disposed items remain listed in HirePOS for tracking and reporting purposes.
Disposed items are excluded from active sales records but can be viewed in Setup > Items and Global Search with a red “Disposed” badge.
To view all disposed items, navigate to Reports > Items > Disposed Items and export the report using the CSV button at the top of the report viewer.