
Create/Update Products in Shopify on New/Updated item in HirePOS
This guide walks through creating a Zapier integration that syncs products from HirePOS to Shopify, including SKU and price updates and publishing to a Shopify sales channel (Online Store).
Note: This flow has been updated to suit Shopify's API changes that occurred in the first half of 2025 that make a traditional product only update no longer possible. Products must now be updated via their default variant. Also, Prems cannot be published to a publication by the old API, and must be published via a GraphQL API. This guide contains steps on how to do that until a simpler method becomes available via Zapier
The Zap dynamically handles:
Creating or updating products in Shopify
Setting variant details
Publishing to the correct sales channel using a
GraphQLcall
This assumes:
You are familiar with Zapier, Shopify, and HirePOS
You are using a Shopify custom/private app for token-based access
You know how to manage API tokens and Zapier apps
Part 1: Setup HirePOS/Zapier
Skip this setup if you already have HirePOS and Zapier connected
Go to
Setup > Preferences > Accounting and other APIs > API Keys (Use for Zapier)Copy your API key and connect your HirePOS account to Zapier
Create a new Zap and select HirePOS as the trigger app
Part 2: Shopify
First half: Connecting Zapier and Shopify via the Public Zapier App (Standard Integration)
If you already have Shopify connected to Zapier, you may still need to work though this step to create the Shopify 'Custom App' which will allow the GraphQL steps in this document to work.
Steps:
In Zapier:
When creating a step that uses Shopify (e.g., “Find Product”), you’ll be prompted to connect an account.
Click “Connect” and log in with your Shopify store credentials.
In Shopify:
Shopify will prompt you to approve Zapier as a third-party app.
Click “Install App” to grant Zapier permissions (read/write products, variants, etc.).
Return to Zapier:
Your Shopify store will now appear in the account selector for any Shopify-based steps.
You can use all standard Shopify actions such as Create Product, Update Variant, Find Product by Title, etc.
Note: This connection works for most basic needs but does not support advanced custom publishing or GraphQL-based logic.
Second half: Setting Up a Custom Shopify App (Required for Webhooks and GraphQL Publishing)
This is required for custom GraphQL steps like publishing products to the Online Store using Webhooks by Zapier.
Steps to Create and Install a Custom App in Shopify:
Open Shopify Admin:
Go to
Apps > App and sales channel settingsClick “Develop apps” in the top-right
Create App:
Click “Create an app”
Enter a name like
Zapier IntegrationChoose yourself or an admin user as the app developer
Configure Admin API Access:
Under “Configuration”, click “Configure Admin API scopes”
Enable the following scopes at minimum:
read_productswrite_productsread_publicationswrite_publications
Click Save
Install the App:
Go to the “Install App” tab
Click “Install” (you may need to confirm again)
Get the Access Token:
After installation, the Admin API Access Token is shown once.
Copy and store it securely — this is your Shopify token used in Zapier Webhook headers.
Example:
X-Shopify-Access-Token: shpat_XXXXXXXXXXXXXXXXXXXXXXXXXXXXUse in Zapier Webhooks:
When creating a Webhook by Zapier step (e.g., to fetch publications or publish a product), use:
URL:
https://your-store-name.myshopify.com/admin/api/2025-04/graphql.jsonHeaders:
Content-Type: application/jsonX-Shopify-Access-Token: <your token>
Why Use a Custom App?
Required for GraphQL queries/mutations to Shopify’s Admin API
Allows precise control over products, variants, publications, and more
Bypasses limitations of Zapier’s new standard Shopify integration
Part 3: Zapier Steps
Step 1 – Trigger: New or Updated Item in HirePOS
App: HirePOS
Trigger: New or Updated Item
This will return the HirePOS item data to sync with Shopify (e.g., Description, SKU, Price)
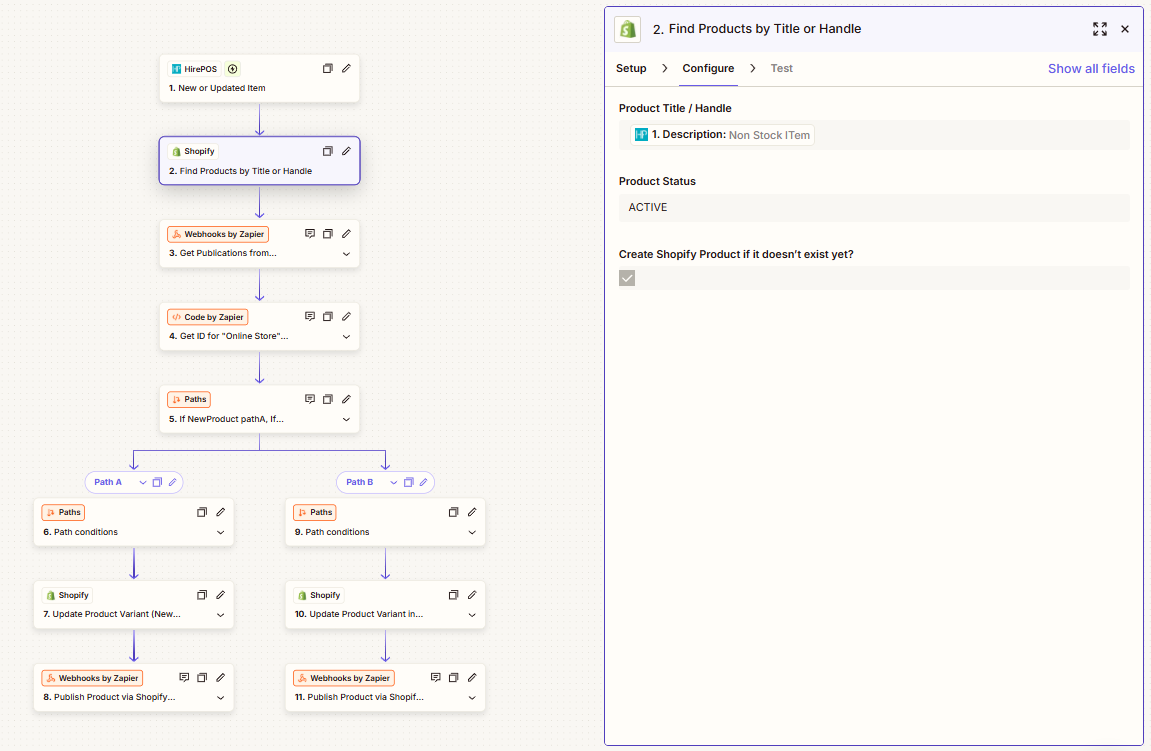
Step 2 – Action: Find Product in Shopify by Title or Handle
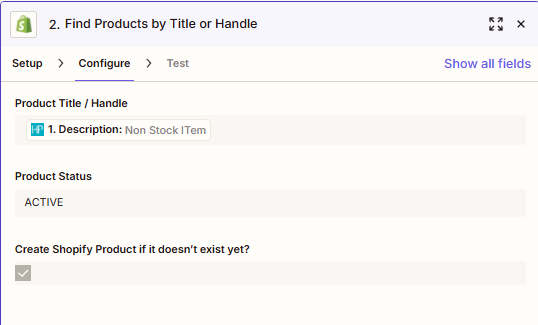
App: Shopify (Zapier's public app)
Action:
Find Product by Title or HandleMatch using a linking field—e.g.,
Descriptionfrom HirePOS =Titlein ShopifyEnable: Create product if it doesn’t exist
This returns:
Product ID
Variant ID (for existing products)
Variant Nodes ID (for newly created products)
Step 3 – Action: Webhook to Get Shopify Publications
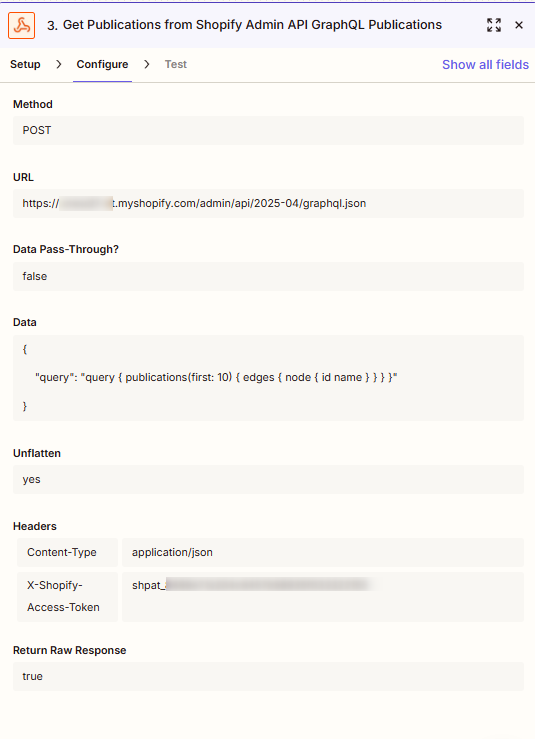
App: Webhooks by Zapier
Method: POST
URL:
https://yourstore.myshopify.com/admin/api/2025-04/graphql.jsonHeaders:
Content-Type: application/jsonX-Shopify-Access-Token: shpat_...(your private app token)
Body:
{
   "query": "query { publications(first: 10) { edges { node { id name } } } }"
}
Return Raw: TRUE
This returns a list of Shopify publications (sales channels), including "Online Store".
Step 4 – Action: Code by Zapier to Get Online Store Publication ID
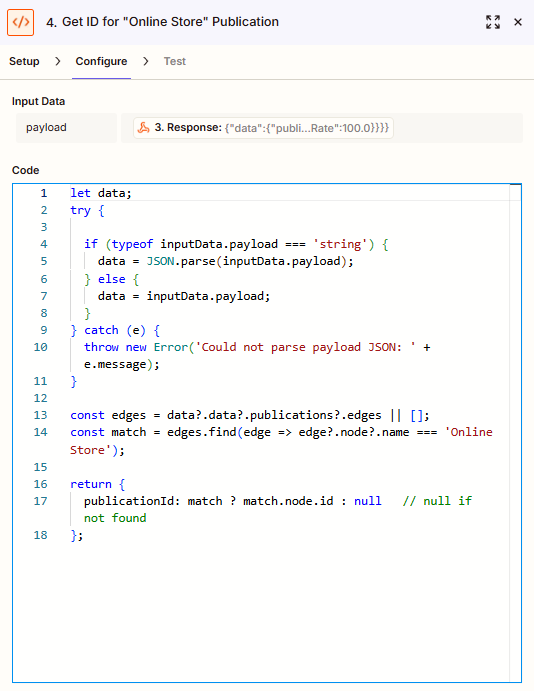
App: Code by Zapier (JavaScript)
Input:
payloadfrom Step 3Code:
let data;
try {

  if (typeof inputData.payload === 'string') {
    data = JSON.parse(inputData.payload);
  } else {
    data = inputData.payload;
  }
} catch (e) {
  throw new Error('Could not parse payload JSON: ' + e.message);
}

const edges = data?.data?.publications?.edges || [];
const match = edges.find(edge => edge?.node?.name === 'Online Store');

return {
  publicationId: match ? match.node.id : null   // null if not found
};
Output:
publicationId
Step 5 – Path: Variant ID Exists?
If
Variants IDfrom Step 2 exists → Path B (existing product)If it does not exist → Path A (newly created product)
Path A – New Product Created
Step 6 – Get Variant Node ID
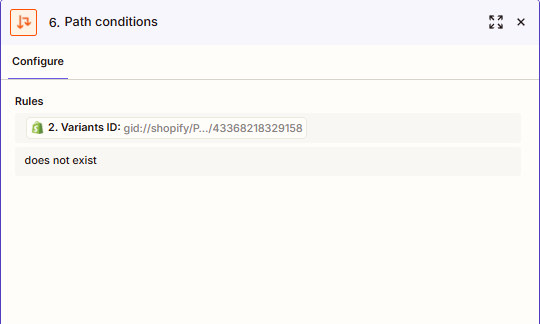
This step will run the path if "Variants ID does not exist"
Step 7 – Update Variant
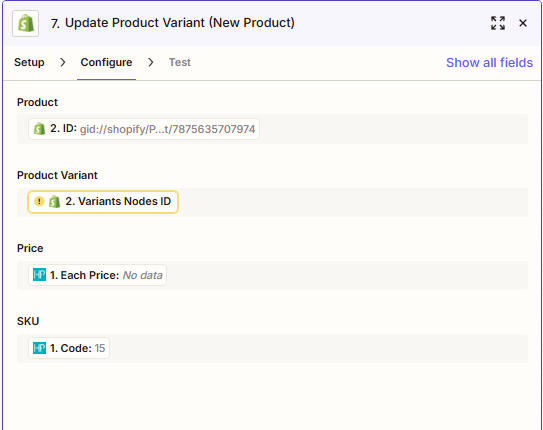
App: Shopify
Action: Update Variant
Inputs:
Variant ID: from Step 6
SKU: from Step 1
Price: from Step 1
Note: You may need to actually use test data that creates a new product in Shopify to be able to see and select this field in the Zapier editor.
Step 8 – Publish Product via Webhook (GraphQL)
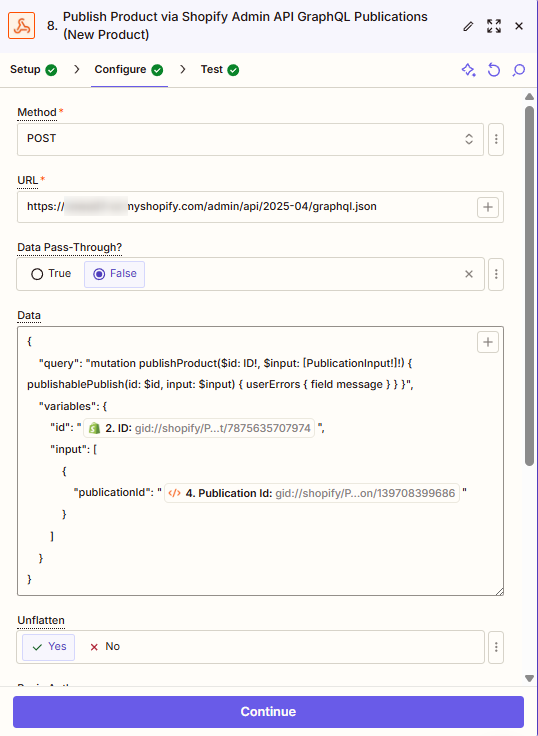
Webhooks by Zapier
Method: POST
URL:
https://yourstore.myshopify.com/admin/api/2025-04/graphql.jsonHeaders: Same as Step 3
Body:
{
  "query": "mutation publishProduct($id: ID!, $input: [PublicationInput!]!) { publishablePublish(id: $id, input: $input) { userErrors { field message } } }",
  "variables": {
    "id": "{{PRODUCT_ID}}",
    "input": [
      {
        "publicationId": "{{PUBLICATION_ID}}"
      }
    ]
  }
}
Token | Replace with |
|---|---|
| The global product ID returned by your “Find/Create Product” step (e.g. |
| The publication ID for Online Store returned by your Code step (e.g. |
Notes
idis the product’s global ID.inputis an array ofPublicationInputobjects; supplying one object publishes to one channel, but you can add more objects to publish to multiple channels in the same call.The mutation returns an empty
userErrorsarray on success.
Path B – Product Already Exists
Step 9 – Use Existing Variant ID
Get
Variants IDdirectly from Step 2 (for found products)
Step 10 – Update Variant
App: Shopify
Action: Update Variant
Inputs:
Variant ID: from Step 9
SKU: from Step 1
Price: from Step 1
Note: You may need to actually use test data that updates an existing product in Shopify to be able to see and select this field in the Zapier editor.
Step 11 – Publish Product via Webhook (GraphQL)
Identical to Step 8
Use the same mutation to publish to the Online Store
With this setup complete, your HirePOS item updates will now seamlessly sync to Shopify—automating SKU, price, and publication updates with full support for Shopify’s latest API changes.
Troubleshooting:
Symptom | Likely Cause / Fix |
|---|---|
GraphQL webhook returns | URL missing |
| Wrong |
| Product is already on Online Store; safe to ignore. |
Code step error |
|