WordPress/WooCommerce
Intro
This article outlines the use case, tools required, initial setup, workflow, and maintenance of a WordPress/WooCommerce/Zapier/HirePOS integration.
This setup applies when a HirePOS user wants to integrate a WordPress/WooCommerce online store with HirePOS to push successfully completed customer orders from WooCommerce into HirePOS for further processing, confirmation, and next steps.
The completed order is pushed to HirePOS via the "Online Store Acceptance" workflow, the same way it would if you were using the fully integrated HirePOS online store.
Limitations
Payments
This guide assumes that wishlists, quote requests, or unpaid bookings are captured in WooCommerce and finalized in HirePOS. Payments received in WooCommerce are not automatically applied to the resulting record in HirePOS. You will need to process these payments against the corresponding quote/booking/invoice in HirePOS as part of your regular payment reconciliation workflow. Tools to assist with this process are planned for a future update. However, at the time of writing, the limitations regarding WooCommerce, HirePOS, and payments are detailed in the following article: https://docs.hirepos.com/en/articles/4474049
Hire Item Availability and Stock Levels
Checking the availability of Hire Items and current stock levels of Sales items in WooCommerce is not currently supported as part of this setup.
It is possible to achieve this functionality with the help of a suitable web developer, who can make use of the HirePOS Availability API endpoint. Documentation for the availability endpoint can be found here: https://docs.hirepos.com/en/articles/2314625. Including HirePOS availability or stock level checking on your WooCommerce product pages will require the assistance of a web developer with experience in WooCommerce development and APIs.
Online Store Options
If you're in the process of selecting an online store solution, there are other options besides WordPress/WooCommerce. Some examples include:
HirePOS Online Store: A turnkey solution with minimal setup, full HirePOS integration, and limited customization. It supports hire item availability.
WordPress + WooCommerce: Flexible and customizable, but requires technical know-how.
Shopify: Easy to use, an all-in-one solution with great support.
BigCommerce: Feature-rich, scalable, with no transaction fees.
Squarespace: Simple, visually appealing, and best for small stores.
There are many other platforms available, and the only essential requirement for connecting with HirePOS is that the eCommerce provider must be connected to Zapier, as Zapier serves as the conduit between HirePOS and your chosen platform. You can check if your selected platform is available on Zapier here: https://zapier.com/apps/hirepos/integrations
Continue reading to learn how to connect HirePOS with WordPress/WooCommerce.
Products/Tools Needed
You will need an administrator or full-access account to the following tools:
WordPress (with a suitable subscription tier to allow the WooCommerce plugin)
WooCommerce Plugin for WordPress
WooCommerce Zapier [WooCommerce Extension] (This plugin enables communication between WooCommerce and Zapier)
Checkout Field Editor for WooCommerce [WooCommerce Extension]
Zapier (A free account will work to begin with, but a paid plan will be required if your order quantity exceeds the limits of the free plan or if you need multi-step Zaps for data cleanup/advanced actions)
HirePOS
Setup HirePOS
Enable API, Online Store and User Access
Ensure the following steps are completed in HirePOS before proceeding:
Ensure API Keys are Ready:
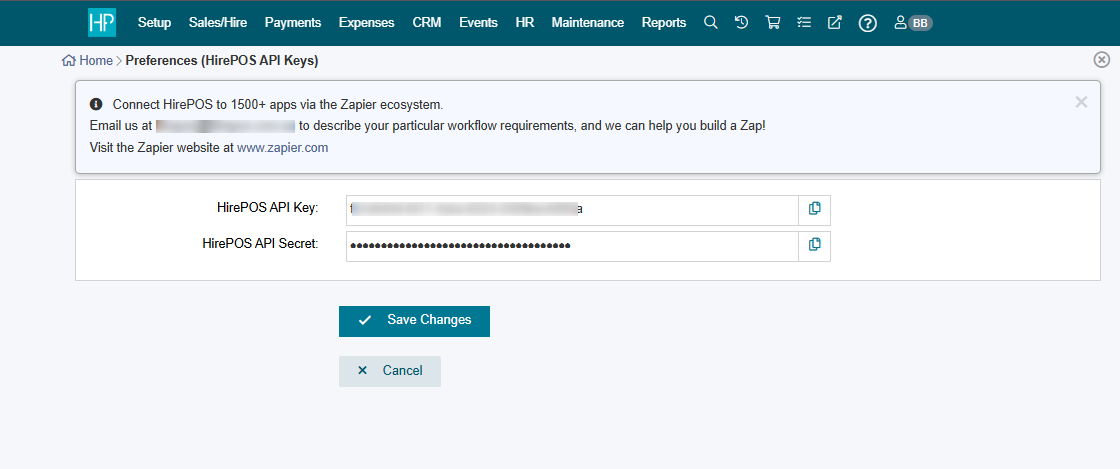
Navigate to Setup > Preferences > Accounting Integration & Other APIs > HirePOS API Keys.
Copy both your HirePOS API Key and Secret. You will need these in the next steps.
Click "Save Changes" to activate your keys (do not close the tab or click "Cancel").
Ensure the Online Store is Accessible:
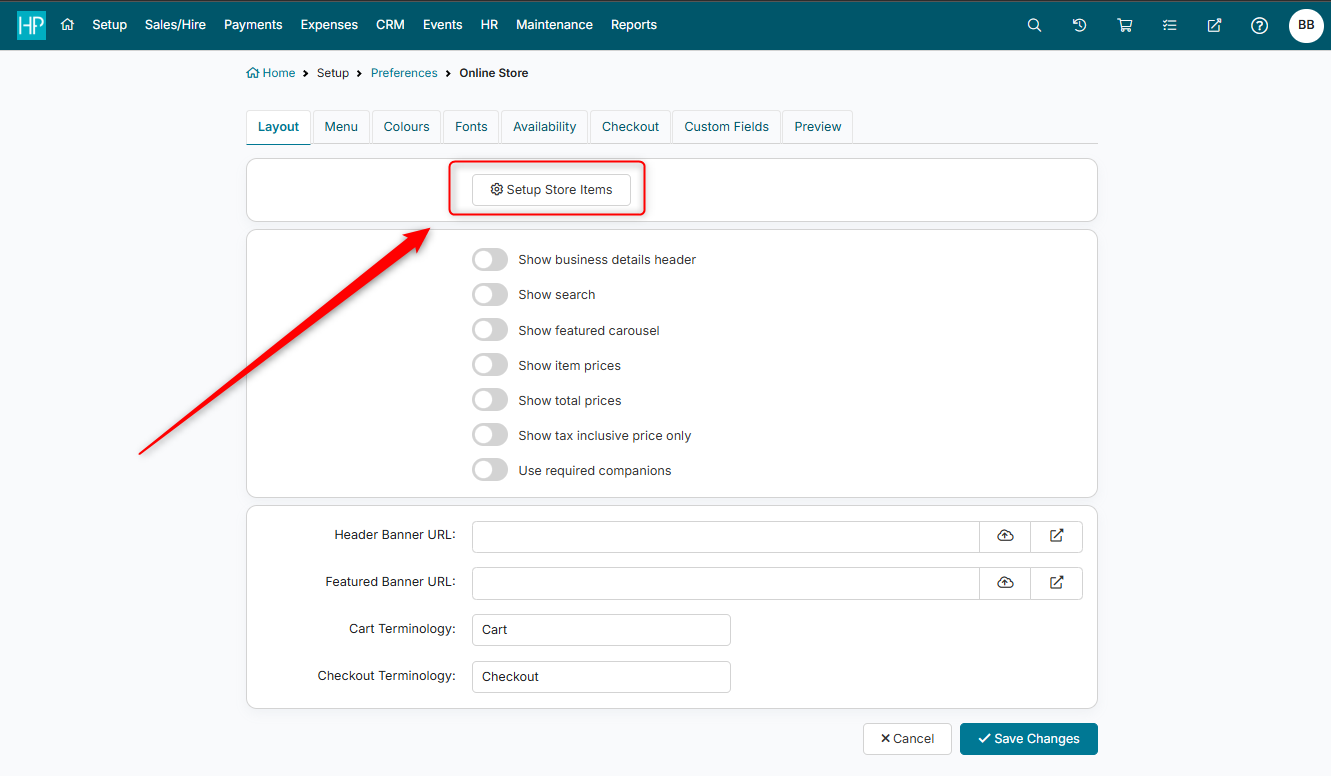
Go to Setup > Preferences > Online Store > Setup Store Items. If you see a list of items, you're good to go.
If you encounter an error, contact HirePOS support as your online store may not be connected yet.
This step is required to map item codes and provide a place for new orders/bookings to be stored.
Ensure Access to the Online Store Order Acceptance Screen:
Enable the Online Store Module:
Go to Setup > Preferences > Modules and ensure "Online Store" is enabled.
Save your changes.
Ensure Your User Account Has Access to the Online Store:
Go to Setup > Preferences > Users and select your user account.
Under "Permissions," ensure the "Allow Online Store" permission is turned "On".
Test Accessibility:
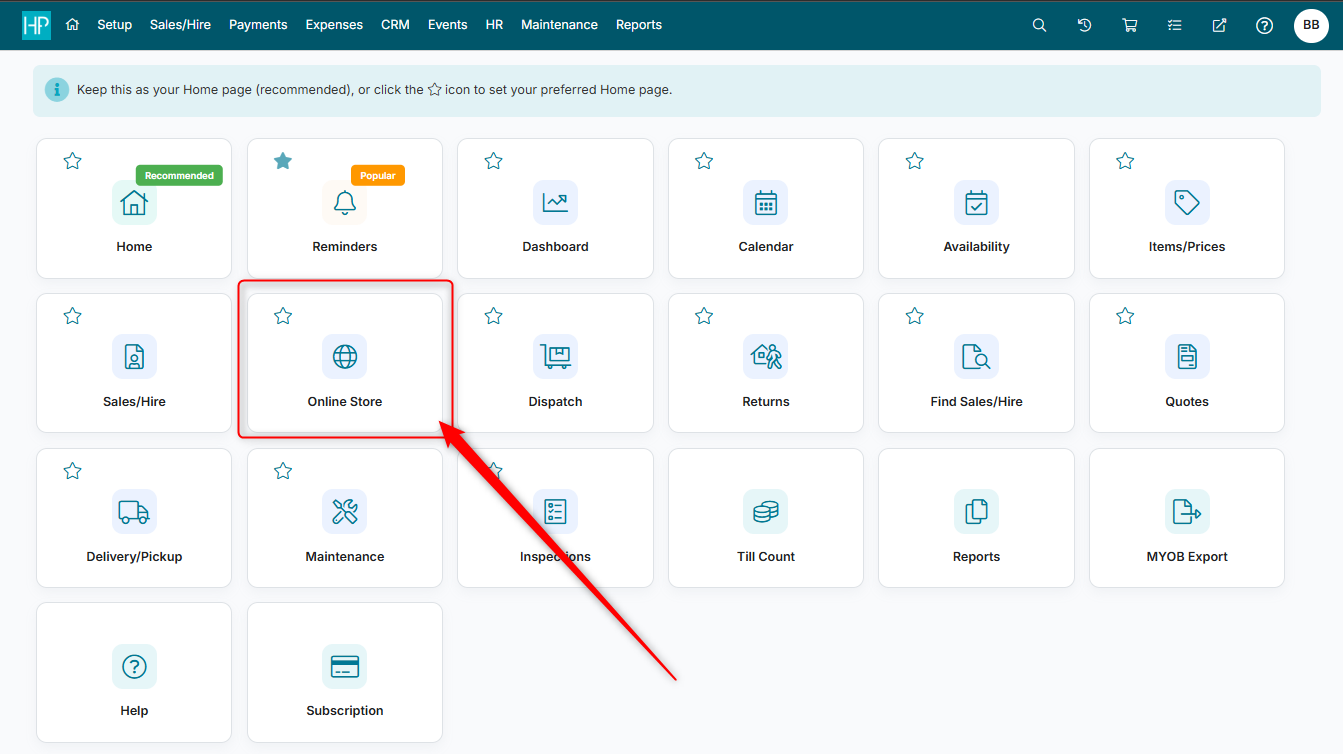
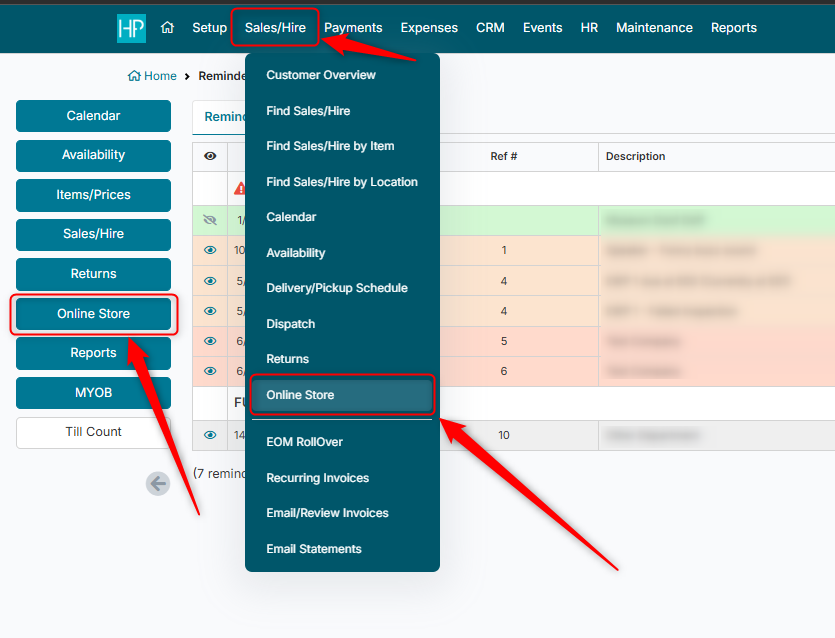
Navigate to the Home Screen or Reminders Screen in HirePOS. There should be a button/link labeled "Online Store."
Alternatively, check the Sales/Hire menu for the "Online Store" option.
Activate Online Store Items
Before submitting an order to HirePOS via Zapier, ensure that all items/products included in the order are active in the HirePOS online store.
To activate items, follow these steps:
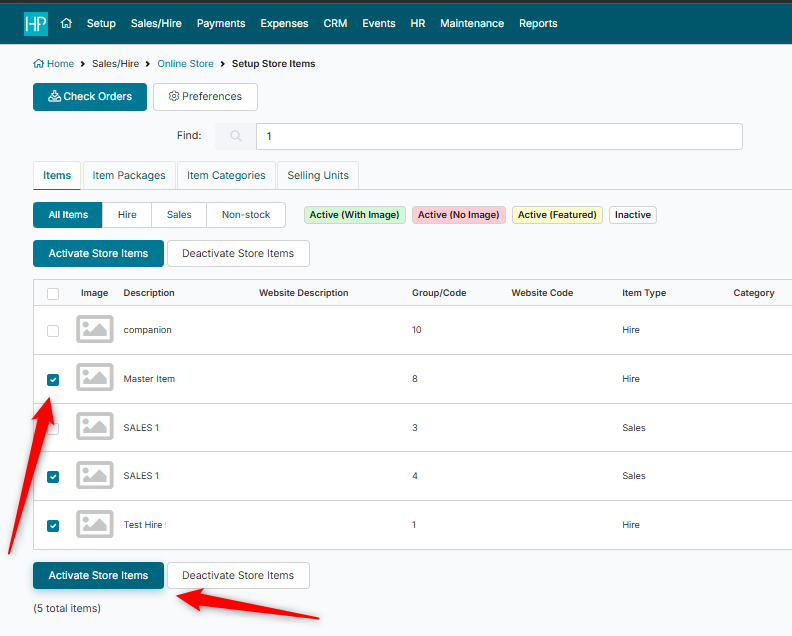
In HirePOS, navigate to Setup > Preferences > Online Store > Setup Store Items.
Search for and select the item(s) you wish to activate using the checkboxes.
Scroll to the bottom of the screen and click Activate Store Items.
An item is considered 'active' in the online store as long as it has a 'website code' defined. Clicking Activate Store Items does this for you, by copying the items Code into the Website Code for you. To deactivate an item, simply remove its website code.
Advanced Setup: Using Custom Website Codes
If you prefer to match items using an identifier other than the HirePOS item code, you can set a custom Website Code. For example, you may have an item in HirePOS with the code "H1" but want the WooCommerce SKU to be "ABC123". In this case, you can set the Website Code to "ABC123" in HirePOS, and HirePOS will match it with item "H1" when the order comes through.
This approach is more flexible but should be used only if absolutely necessary.
Note on WooCommerce Integration
In a WooCommerce deployment, the website description and other item properties in HirePOS are not functional for WooCommerce—they are intended for use with the HirePOS online store. So, you won't need to worry about them when using WooCommerce as your external store.
Using Item Packages (Package Codes)
In addition to matching individual items using the Website Code, you can also submit Package Codes when sending an order to HirePOS via Zapier or WooCommerce.
Packages are defined in Setup > Item Related > Item Packages, and each can have its own unique Package Code. When an online order includes a Package Code instead of an Item Code, HirePOS will:
Recognize it as a package
Add all items in the package to the order
Use the descriptions and pricing defined within the package
For example, if you create a package called Item Package with the code P1, and it includes items 1, 2, and 3:
Passing
P1in the order will result in items1,2, and3being added to the order with the package-defined settings.Passing
1alone would just add item1by itself.
This makes it easy to group multiple items under a single product in WooCommerce and have them expand into individual lines in HirePOS upon order submission.
Note: HirePOS automatically resolves whether the submitted code is a Website Code (individual item) or Package Code (bundle). Just ensure the code matches exactly.
Setup WordPress/WooCommerce
This section outlines the initial setup required in your WordPress/WooCommerce environment. For more detailed information, please refer to the relevant WordPress or WooCommerce documentation:
WordPress
Log in to your WordPress dashboard and ensure "WooCommerce" is available in the side menu. If not, install it via the Plugins menu. This may require a change to your WordPress subscription in some cases.
At the time of writing, there are no known "free trial" offerings for WordPress + WooCommerce that allow plugin installations, making it effectively impossible to connect Zapier to WooCommerce for free or to evaluate this setup.
WooCommerce Products
If you have WooCommerce available in your WordPress admin, proceed with the following:
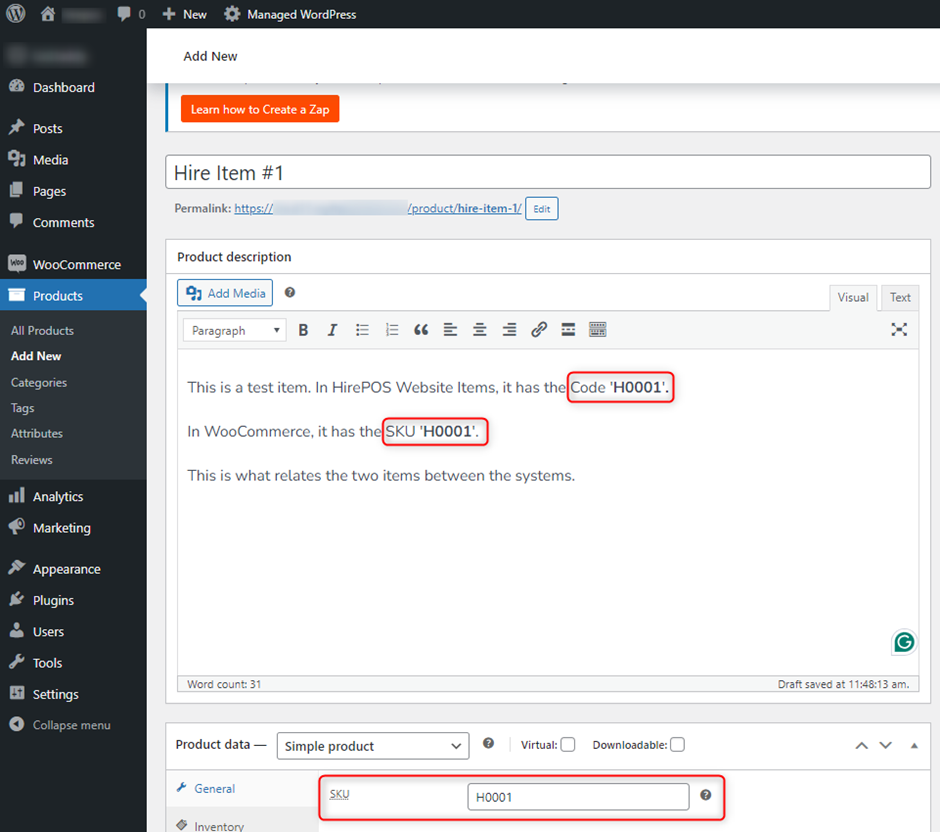
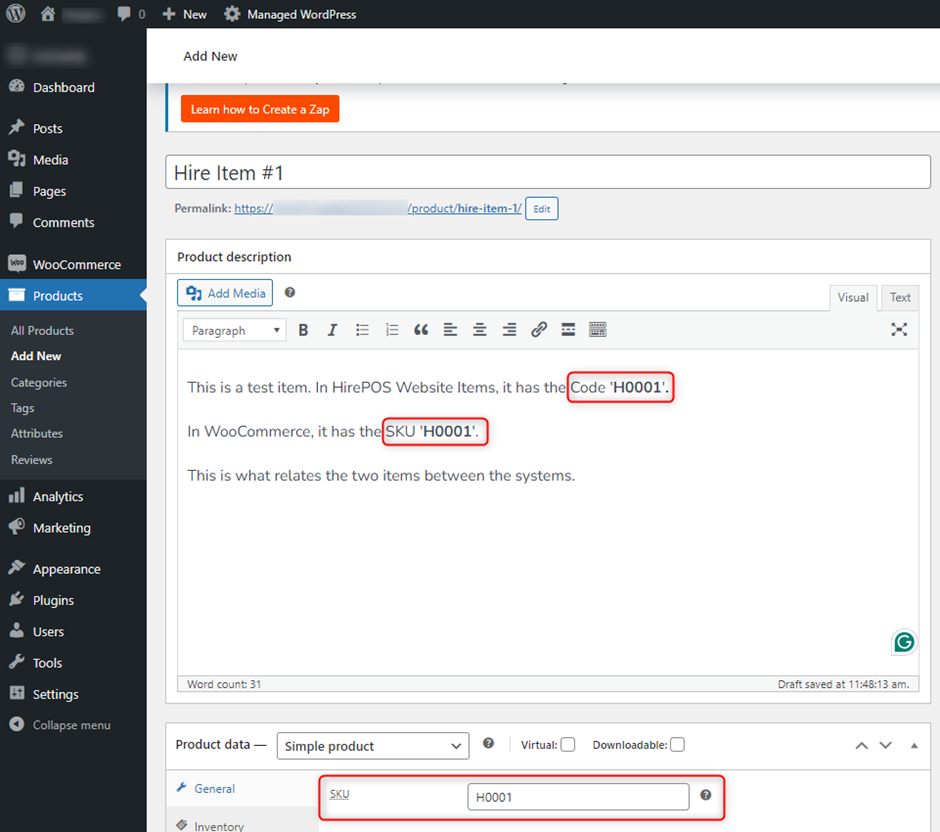
Your WooCommerce products need a unique property/identifier to link them to HirePOS items. A common approach is to ensure the WooCommerce SKU for each product matches the Item Code of a corresponding item in HirePOS. For example, if you have a 1.7t excavator in HirePOS with the Item Code "ex1.7," ensure the corresponding WooCommerce product has an SKU of "ex1.7."
Outside of this relationship, you are free to customize your WooCommerce products as desired, adding any relevant details for customer viewing.
Refer to the "Matching Data (concept)" section at the end of this guide for more details.
WooCommerce Zapier Extension
Navigate to WooCommerce > Extensions in your WordPress admin.
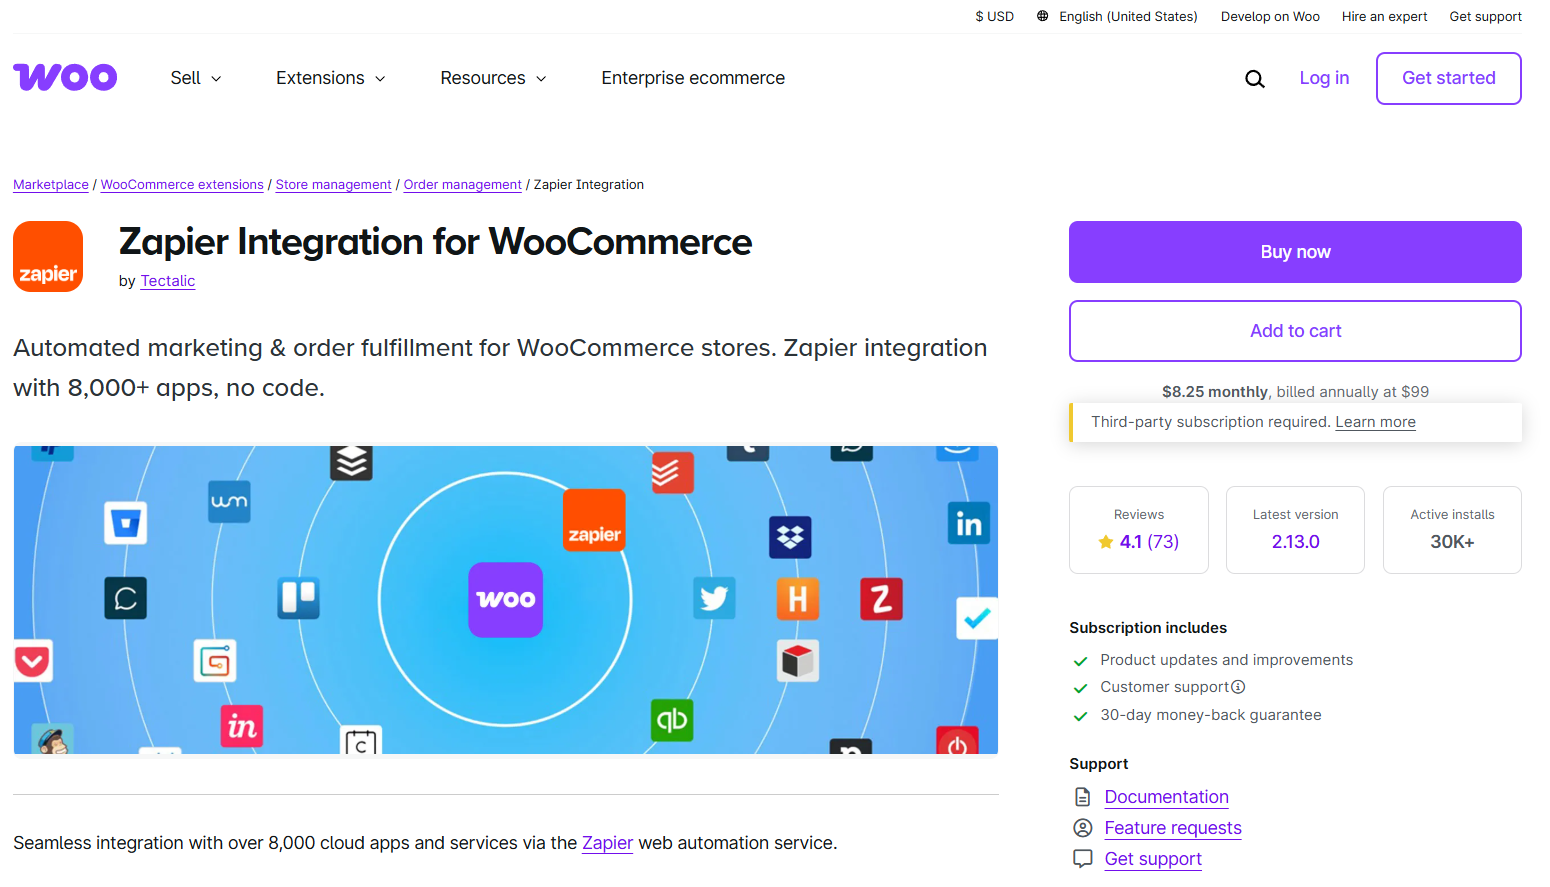
Search for the "Zapier" plugin and install "Zapier Integration" or "Zapier Integration for WooCommerce" by "Tectalic" (formerly "OM4 Software").
If your site is hosted on WordPress.com, the plugin should install automatically. If it does not, you can manually upload the plugin by:
Navigating to Plugins > Add New Plugin > Upload in your WordPress admin area.
Upload the downloaded
woocommerce-zapier.zipfile, and allow it to install.Click "Activate."
Confirm that the 'Zapier' option appears in the WooCommerce side menu.
For detailed instructions on this plugin, visit the official page:
https://woocommerce.com/products/woocommerce-zapier/
WooCommerce Order/Checkout Page
The following section outlines general guidelines for your checkout page, which, in addition to items in the cart, will gather the required information for a new quote to be placed in HirePOS.
Capture the Essentials
Ensure you capture the following data points on the WooCommerce checkout page, as this information will be passed to HirePOS for further processing:
Booked From Date (desired hire start date)
Booked To (desired hire end date)
Event Date (useful for event companies)
Billing details: Company name, First and Last Name, Address, Phone, Email
Shipping Address
Customer Notes
These fields are essential, but some can be omitted based on your requirements. At a minimum, ensure you capture a name and email address.
Booking/Hire/Event Dates and Additional Fields
To capture additional booking or event dates, you will need a plugin such as "Checkout Field Editor for WooCommerce." You can use any plugin that meets your needs, but this one worked without issues during our testing.
Date Format Considerations
When working with dates in WooCommerce and HirePOS, it’s crucial to ensure that the date format is consistent. HirePOS expects dates to be serialized in the yyyy-MM-dd or yyyy-MM-dd HH:mm format.
Avoid using formats like dd/MM/yyyy or MM/dd/yyyy as they can cause issues, especially when the date is within the first 12 days of the month. For example, a date of 03/05/2025 could be interpreted as March 5th in one system and May 3rd in another, leading to incorrect order processing. To ensure accuracy, always use the yyyy-MM-dd format (e.g., 2025-03-05) when entering or syncing date fields between systems.
If you do not have control over the date format in WooCommerce, you can use the Formatter by Zapier as an additional step in your Zap. This will allow you to convert the date to a supported format before it is sent to HirePOS. To do this:
Add a Formatter step in your Zap after the WooCommerce trigger.
Choose the Date/Time action and configure it to convert the WooCommerce date into the
yyyy-MM-ddoryyyy-MM-dd HH:mmformat.Map this reformatted date to the relevant HirePOS fields.
Using Formatter by Zapier can help ensure the correct date format is used, even if WooCommerce sends the date in a different format.
WooCommerce Zapier Application Password
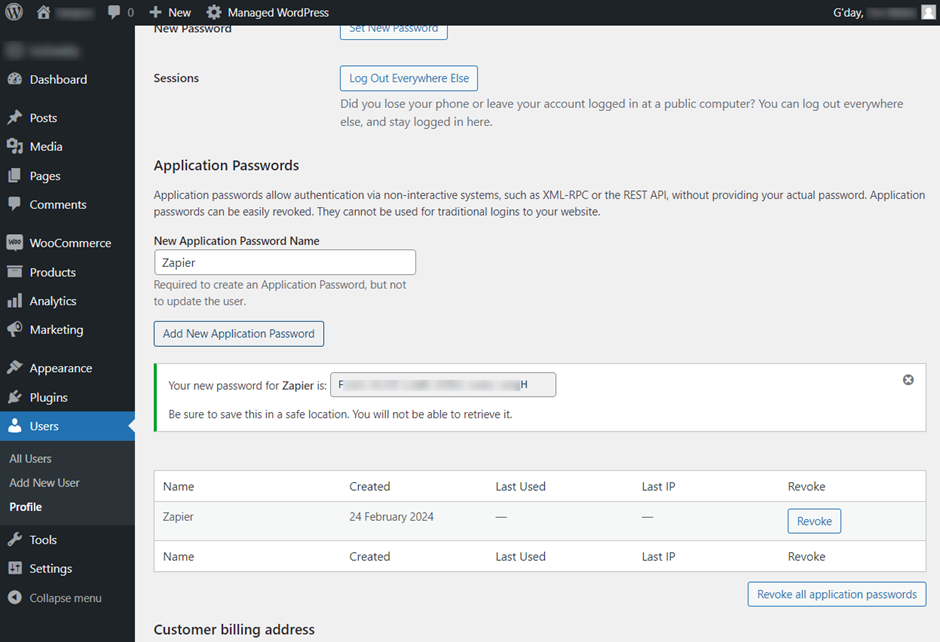
To enable the Zapier Integration Plugin to communicate with Zapier, you need to create an "application password" for Zapier to use when connecting to WooCommerce.
Create a Zapier Application Password
In WooCommerce, navigate to Users > Profile.
Scroll down to the "Application Passwords" section.
Enter "Zapier" in the "New Application Password Name" field.
Click "Add New Application Password."
Copy and save the generated password, as you will need it later. (If you lose this password, revoke access and generate a new password using these steps.)
For more information, see the Zapier Integration documentation.
Zapier
You will need a full-access Zapier account for the next steps. This section outlines the actions required to connect WooCommerce and HirePOS through Zapier.
Login to Zapier
Log in to your Zapier account.
Navigate to zapier.com.au and either log in with your existing credentials or create a new account.
Connect Zapier to WooCommerce
After logging in, navigate to the "Apps" section of the Zapier side menu.
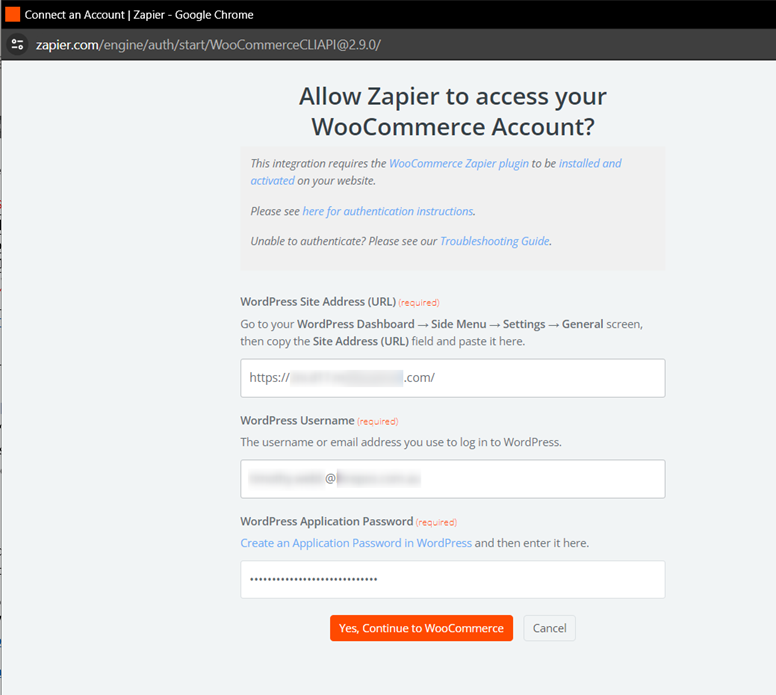
Click "Add Connection," then search for and select "WooCommerce."
Provide the following details:
Your WordPress Site URL (e.g., ‘www.company.com’)
Your WordPress Username (not 'zapier', but your administrator username)
The Zapier Application Password created earlier.
Connect Zapier to HirePOS
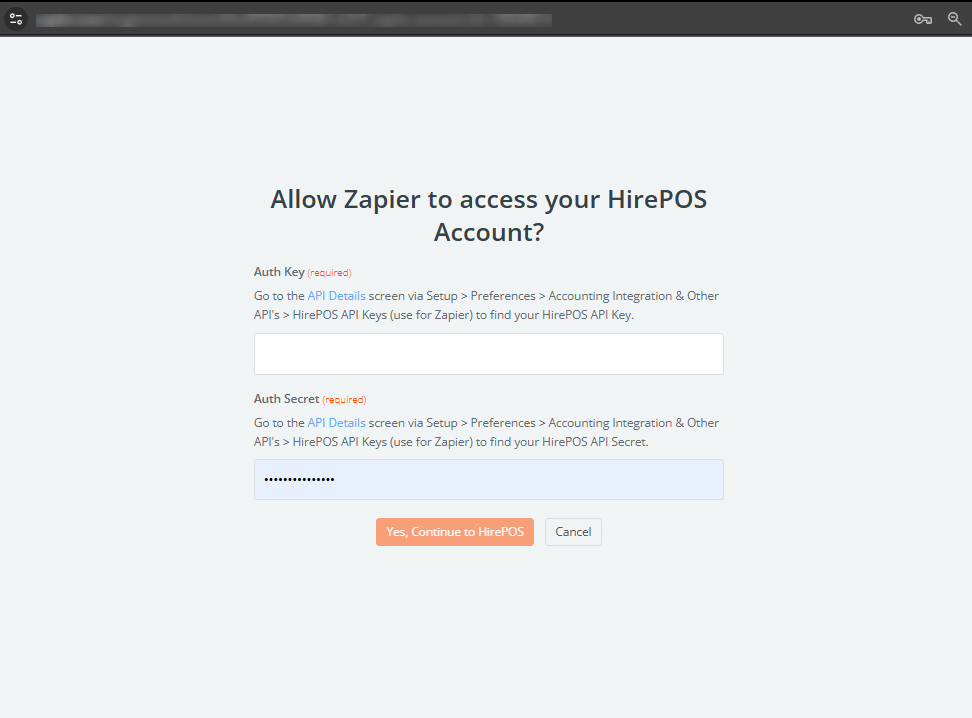
In the "Apps" section, click "Add Connection" and search for "HirePOS."
Provide the following details:
Your HirePOS API Key (in the "Auth Key" field)
Your HirePOS API Secret (in the "Auth Secret" field)
You can find this information in Setup > Preferences > Accounting Integration & Other APIs > HirePOS API Keys (use for Zapier).
Build Your First WooCommerce/HirePOS Zap
You can speed up the process by using the WooCommerce/HirePOS Zap Template: [Zapier Template Link].
Alternatively, you can create your Zap manually.
Add the WooCommerce Trigger and HirePOS Action to the Zap
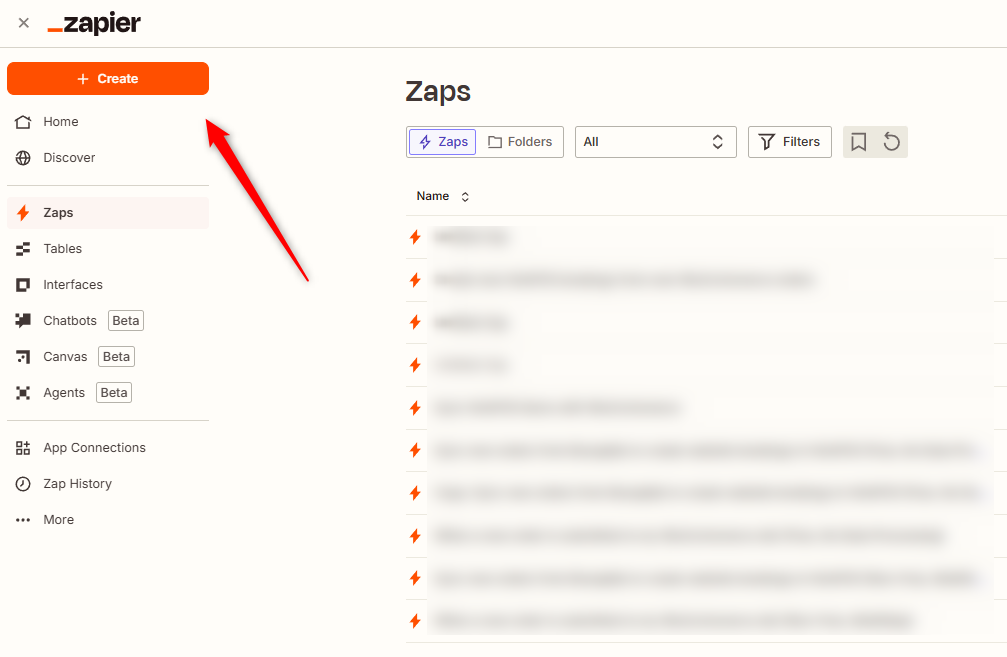
In Zapier, click "+ Create," then select "Zaps."
Add the WooCommerce trigger and HirePOS action:
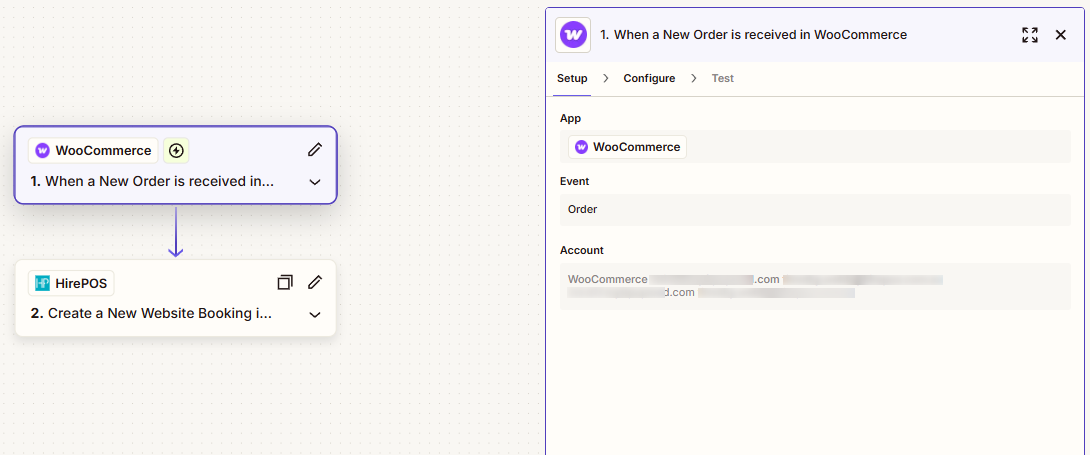
Click "Trigger," search for and select "WooCommerce."
Click "Action," search for and select "HirePOS."
Configure the WooCommerce Trigger
In the "Setup" section:
Set the "Trigger Event" as "Order"
Select the connected WooCommerce account.
In the "Configure" section:
Set the trigger rule as "Order Created."
Click "Test" to ensure the trigger works.
You will need an existing order in WooCommerce for testing. Ensure the order has complete billing/shipping details, booking dates, and at least one item with an SKU.
Configure the HirePOS Action
In the "Setup" section:
Set the "Action Event" as "Create Website Booking."
Select the connected HirePOS account.
In the "Configure" section:
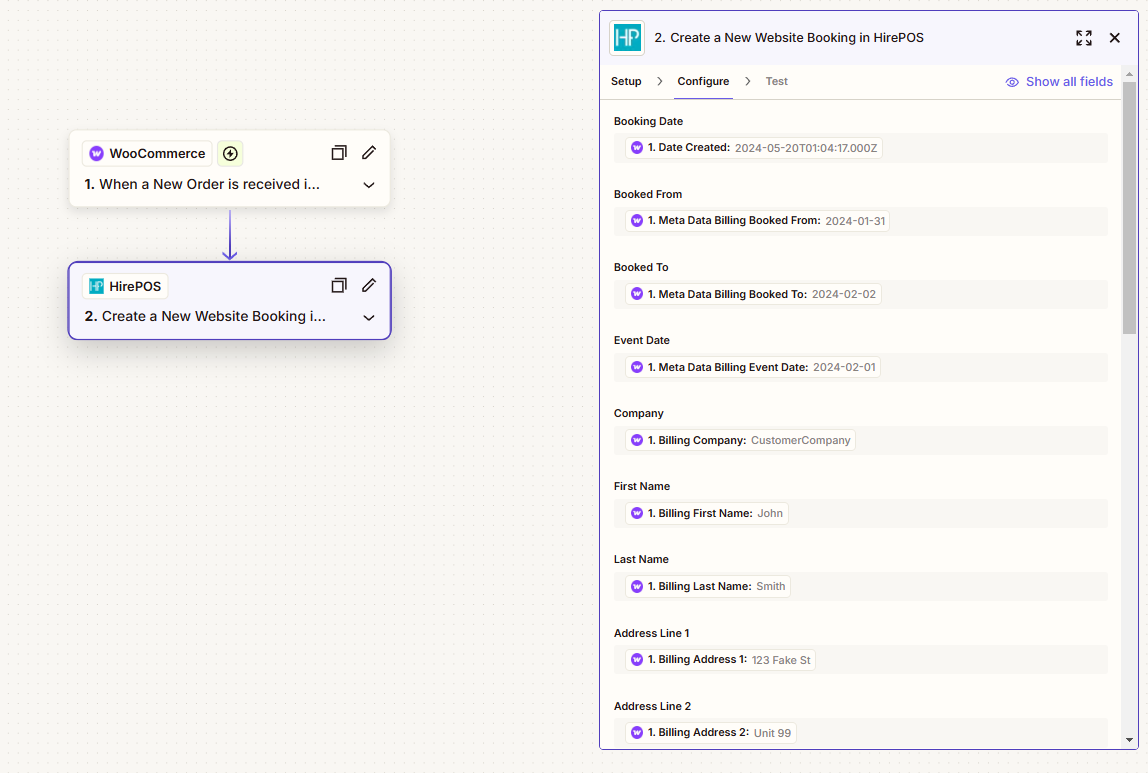
Map the WooCommerce data fields to HirePOS fields (see the table below).
Use the "Test" section to send a test booking/quote to HirePOS.
If everything is set up correctly, the test order will appear in HirePOS.
WooCommerce/HirePOS Field Mapping
The table below shows the WooCommerce order fields that need to be mapped to HirePOS fields in the HirePOS Action step of the Zap. Keep in mind that the names of your WooCommerce fields may vary depending on the Checkout Fields plugin you're using and how the fields are named in WooCommerce. In some cases, these fields may appear as 'meta' or 'custom' fields, each containing a 'name' parameter and a 'value' parameter. You will need to extract the 'value' parameter in these instances.
Fields that may require the use of a plugin to capture in WooCommerce are indicated with a caret (^) symbol.
HirePOS Fields | WooCommerce Data |
Booking Date | Date Created |
Booked From | ^ Meta Data Billing Booked From |
Booked To | ^ Meta Data Billing Booked To |
Event Date | ^ Meta Data Billing Event Date |
Company | Billing Company |
First Name | Billing First Name |
Last Name | Billing Last Name |
Address Line 1 | Billing Address 1 |
Address Line 2 | Billing Address 2 |
City | Billing City |
State | Billing State |
Postcode | Billing Postcode |
Country | Billing Country |
Phone 1 | Billing Phone |
Phone 2 | empty |
Phone 3 | empty |
Fax | empty |
Billing Email | |
Delivery Address Line 1 | Shipping Address 1 |
Delivery Address Line 2 | Shipping Address 2 |
Delivery City | Shipping City |
Delivery State | Shipping State |
Branch Code | Not Required. |
Reference | Not Required. |
Invoice Category Name | Not Required. If used, the category name must match an Invoice Category in Setup > Invoice Categories. This is case sensitive. Use a predefined list dropdown in WooCommerce, or additional logic in Zapier. |
Message | Customer Note |
Comments | The following joins together several fields with some hard-coded text. This will populate your HirePOS comments (internal) with additional information about the job status. The result will look a bit like:
|
Items | --- |
Code | Line Items SKU |
Quantity | Line Items Quantity |
Custom Field 1 | Not Required. |
Custom Field 2 | Not Required. |
Custom Field 3 | Not Required. |
Custom Field 4 | Not Required. |
Custom Field 5 | Not Required. |
Custom Field 6 | Not Required. |
Custom Field 7 | Not Required. |
Custom Field 8 | Not Required. |
Matching Data (Concept)
When integrating HirePOS with WooCommerce, it's essential to align the identifiers between the two systems. This could be SKU, ID, or another unique identifier.
The key challenge is ensuring that WooCommerce products correspond correctly to HirePOS items. This alignment can be achieved by ensuring the SKU or Item Code matches on both platforms. If the identifiers differ, the systems won’t sync correctly.
For example, a product named 'White Table' with SKU 'WT01' in WooCommerce should have the same Item Code 'WT01' in HirePOS for seamless integration.
Rates/Prices and Synchronization
When integrating HirePOS with WooCommerce, it's essential to understand how pricing works between the two systems. Similar to most other e-commerce solutions, WooCommerce is primarily designed for sales transactions, which typically involve a single price per item. However, with HirePOS, the pricing can vary based on the duration of the hire or other factors, as it's designed for the hire and rental industry.
Key Points:
WooCommerce Prices Do Not Transfer to HirePOS: The price that is displayed in WooCommerce for an item does not get transferred to HirePOS. Rather, the pricing set within HirePOS will be used when the order is accepted into HirePOS.
Correct Pricing in HirePOS is Crucial: All products in WooCommerce must have matching items in HirePOS, and the pricing in HirePOS must be correct. When an item is added to the cart in WooCommerce, the prices will not reflect HirePOS rates unless those rates are already set correctly in HirePOS.
AutoCalc for Pricing Calculation: HirePOS includes a feature called AutoCalc, which allows for dynamic pricing based on the duration of the hire. For example, if a customer rents an item for 3 days, AutoCalc will calculate the total price for those 3 days based on the per-day pricing set in HirePOS. This is something that WooCommerce and most other e-commerce platforms do not support.
How to Sync Prices:
Ensure Correct Pricing in HirePOS: You need to make sure that the prices in HirePOS are correctly set up, including any hire duration-based pricing. If you are offering an item for rent, ensure that its hire price is set per day, week, or month as required.
Ensure Price Consistency with WooCommerce: If you're offering an item with a fixed price in WooCommerce, simply ensure that the 'Each' price in HirePOS is the same as the price you advertise on WooCommerce. This ensures the prices align when customers complete an order on WooCommerce and the order is transferred to HirePOS.
Multiple Pricing Based on Duration: For items where pricing varies based on the duration of hire, you will need to ensure the pricing logic in HirePOS is set up with AutoCalc. WooCommerce will not handle this dynamic pricing, but HirePOS will automatically calculate the correct price based on the hire period entered in the order.
Security Best Practices
When setting up your HirePOS and WooCommerce integration, it's essential to follow good security practices to protect your API keys and user credentials:
API Key Hygiene: Always keep your API keys secure. Never expose them in a public-facing manner or share them unnecessarily. Store keys securley.
Use Restricted API Keys: When possible, limit the scope of your API keys to only the permissions needed for the integration. This will reduce the risk if keys are compromised.
Secure Your WordPress/WooCommerce Installation: Ensure your WordPress installation is kept up-to-date with the latest security patches. Consider using security plugins that offer features like two-factor authentication (2FA) and limit login attempts.
Check Your Hosting: Ensure that your hosting environment is secure and supports SSL/TLS encryption for all API connections.
Updates and Compatibility Disclaimer
Please note that while we maintain control over HirePOS and its updates, we cannot guarantee that updates to WooCommerce, WordPress, or Zapier won’t affect the integration. These third-party platforms may introduce changes that could impact the functioning of the integration.
WooCommerce/WordPress Updates: We recommend testing updates to WooCommerce and WordPress on a staging environment before applying them to your live site. This will help prevent any breaking changes that could disrupt the integration with HirePOS.
Zapier Updates: Similarly, while HirePOS works with Zapier to facilitate integration, changes or updates to Zapier’s platform can also affect your zaps. Always verify that the triggers and actions work as expected after any updates.
Troubleshooting
This section includes common issues/FAQs and troubleshooting steps for different scenarios.
Issue | Potential Solution |

