Prepaid Long-term Hire Workflow
This guide explains the recommended workflow for long-term hires where extra funds are required before the hire starts.
These upfront payments may include:
A Deposit – a partial payment toward the hire.
A Bond – an additional amount held as security, separate from the hire charges.
The Bond can be a fixed security amount, an amount equal to a set hire period (for example, four weeks), or a combination of both.
Collecting these funds before the equipment goes out ensures you are financially covered. When the hire ends, any unused Bond amount can be refunded to the customer.
Prerequitites for this workflow
Item Bond Required Settings
You should set the Bond Required for all of your hire equioment so this can be auto-calculated as you create your Bookings/Contracts.
Go to Setup > Items.
Click a hire item to edit.
Click the Rates/Prices tab, then go to the Bond /Deposit section.
Enter the Bond required as a fixed dollar Amount $.
💡Tip: the Bond can be imported in bulk from a spreadsheet. Reach out to the HirePOS support team for assistance with the bulk import if required. You can add a formula to your spreadsheet to calculate the Bond as 4 x Weeks Hire for example plus an extra security deposit.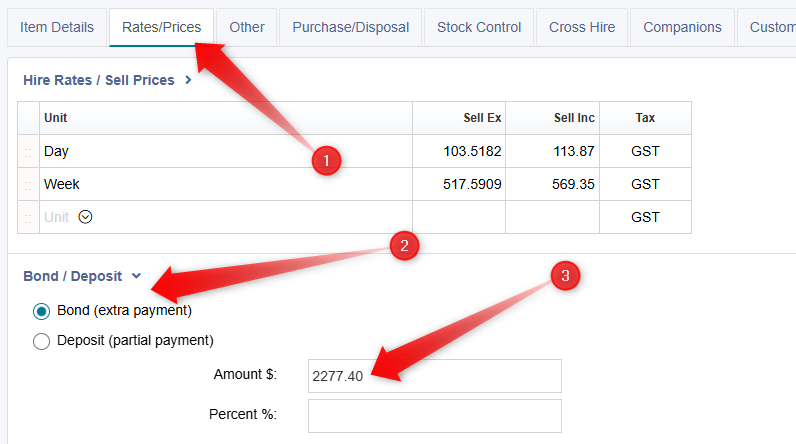
Click the Save Changes button at the bottom-right.
Bond Preference Settings
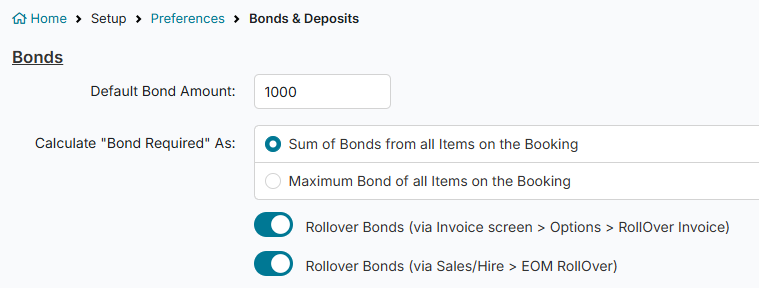
You will need to enable a few once-off preferences to control how Bonds are calculated.
The Default Bond Amount acts as a fallback if no Bond is set on the hire items. In most cases, the Bond will be calculated from the items being hired.
You can then choose how Bonds are applied:
Sum all item Bonds – adds together the Bond value of every item on the job.
Use the highest item Bond – applies only the single highest Bond value from the items on the job.
Go to Setup > Preferences > Bonds & Deposits.
Set your desired Bond preferences and most importantly, ensure both Rollover Bonds toggles are switched ON.
Click the Save Changes button located towards the bottom.
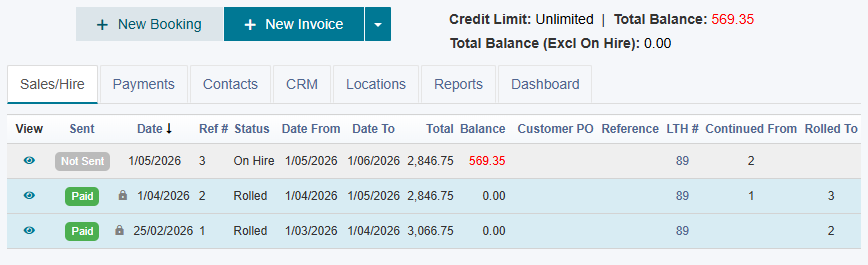
The Full Workflow
We will now step through the full workflow. Create the initial Booking or Contract, collect the Bond upfront, and place the job On Hire. Each month, roll the job forward to continue invoicing the hire charges. At the end of the hire, return the equipment, refund any remaining Bond if required, and close the job.
Create the initial Booking/Contract
Go to Sales/Hire > Customer Overview.
Lookup customer or add new customer if necessary.
Click the New Booking button.
Set the Book From and Booked To dates for the full contract term. This is the agreed and scheduled hire period.
💡Tip: You can click the "Time Span" to set the duration instead of manually selecting a "Booked To" date.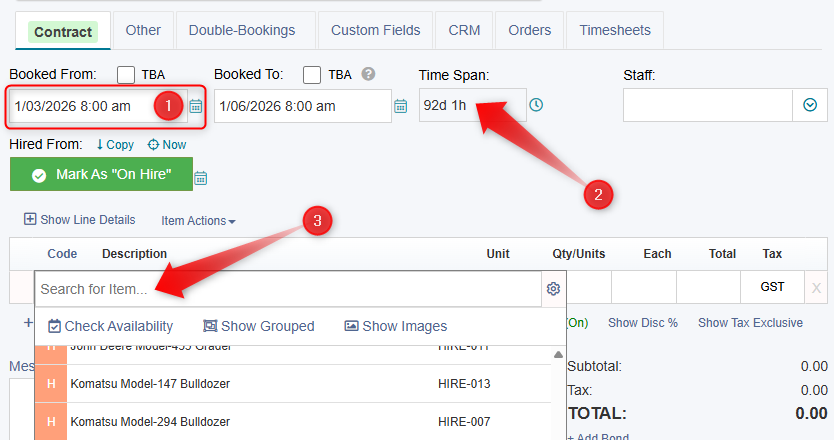
Select the equipment via the Code dropdown column in the line items grid. Add the hire equipment, and add any Sales or Non-stock lines as needed, for example you may have Delivery Charges.
Click the Add Bond link displayed just below the TOTAL section at the bottom-right of the page.
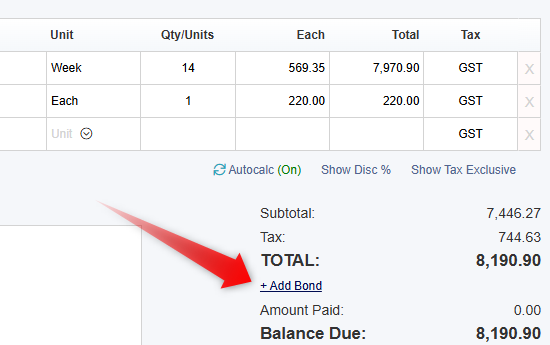
Click the 🔁Calculate link displayed next to the "Bond Required" field. This will calculate the Bond Required automatically for you based on your Items setup.
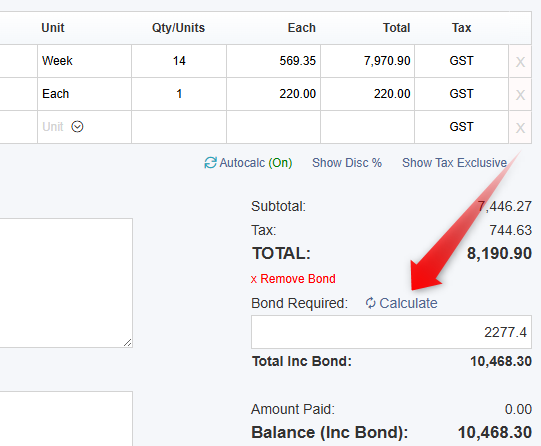
Preview and/or Email the Booking for the purpose of collecting the initial Bond/Deposit amounts. Record the Bond Payment as covered in the Payment help guides.
Dispatch the equipment
Next, mark the equipment as On Hire by setting the Hired From date on the Booking/Contract.
You can do this by:
Opening the job and manually entering the actual date and time the equipment went on hire, or
Allowing the system to auto-populate the Hired From date through the Dispatch or Delivery/Pickup Schedule screens.
End Of Month Rollover (Overview)
To recap, you collected the Bond upfront before the hire began, ensuring it covers the first month’s hire and any additional security required. You’re financially protected from the start.
At the end of each calendar month, you roll the job forward.
This will:
Create an invoice in arrears for the month just completed, including hire charges, delivery fees, damage waiver, sales items, and any other charges.
Finalise that month, with the invoice ready to send for payment.
Create a new On Hire record for the current month in progress.
During the new month, you can add extra charges if needed or return specific equipment.
Equipment still on hire will continue to roll each month. Sales and Non-Stock items will automatically drop off future invoices to avoid double charging, unless they are set as Rollover Items, in which case they will continue to appear on each invoice throughout the hire.
Perform an EOM Rollover
⚠️ Important: This process is to be performed after the end of the calendar month.
Only Administrator users can perform the bulk EOM Rollover action, not General users.
Go to Sales/Hire > EOM RollOver.
For example, if the hire started on 1 March 2026 and you are now at the beginning of April 2026, the Start of New Billing Period will automatically default to 01/04/2026. Leave this date as it is. Do not change it.
Use the checkbox on the far-left of the EOM RollOver screen to select all jobs (only the currently On Hire jobs are shown).
Click the Roll Over Invoices button near the bottom of the screen. The Lock Rolled Invoices option is turned ON by default. This prevents General users from editing the rolled invoices, as these invoices are finalised and ready to be sent out.
Click the Review & Email Invoices button.
The Email/Review Invoices screen shows invoices that have been Rolled or Returned. By default, it excludes any jobs that are still On Hire. This ensures you only email completed invoices for the month just finished, where the charges are finalised and will not change.
Check the box located at the top of the grid on the far left to select all the Invoices, then click the Email Invoices button.
Return the equipment and conclude the hire
After rolling the hire each month, the job will eventually appear as an upcoming return in the main Reminders screen, or a Pickup in the Delivery/Pickup Schedule.
To complete the hire, you must return the equipment and enter the Hired To date and time on the Invoice screen. This flags the job as Returned and confirms the equipment is back.
On this final invoice, you can add any additional charges, such as damage or transport fees.
The final balance — including any refund or extra amount owing — will appear in the TOTAL section at the bottom right of the Invoice screen.
⚠️Important: You must have the Hired To date/time populated for the final balance to be calculated correctly with the Bond already paid taken into account.
You can then process a refund or send this final Invoice to the customer for any outstanding charges as required.